13 Dez, 2012 von Philipp Hock
Writing a Pecha Kucha Presentation-Timer in Java
The first question many people will have is: What is this “Pecha Kucha” thing after all? And as I mentioned in my profile, one of my interests is presentations. In short; pecha kucha is a presentation technique where every slides lasts exactly 20 seconds with 20 slides in total.
The motivation for this comes from the lecture Mobile Human Computer Interaction by Enrico Rukzio where the exercises demand such kind of presentation. But I will not go into much detail about this, the more important questions is: Does the current presentation-programs feature this technique? And the answer is: Yes, but often presentations are held with PDFs which do not feature it.
So I decided to write a little java-application that extends every presentation-program with this feature. I used java because it is platform independent and I wanted to be compatible with most programs and most OS. Also java has a very (very) cool class called
java.awt.Robot
which allows you to send keystrokes system-wide! Yes, pretty cool; and it works for Windows, Linux and Mac.
This also explains the way I implemented it. Just sending Page-Down keystrokes to the system, when the presentation is running. This will click the next slide in a given amount of time automatically. Page-Down because most hardwarepresenters also use this keystroke to fulfill their purpose.
This post is about how I program little applications and should give everyone a little look how I write code. One important thing I learned at the University is the importance of requirements and software engineering. In short: Think about what you do, the program must exist in your head (or at least on papers and diagrams) before a single line of code is written. Even is such small programs like this one.
Let’s do some requirements engineering:
The first thing we need to know is, what should your program do, and more important, what should it not do!
So, we need a program that should automatically switch slides on a presentation in a given amount of time. The program should work with most OS and most presentation-programs. Controlling the program should be possible via a Trayicon and Formdialog. Every controlling-element should indicate if the timer is started or stopped. Before the program should switch slides, the user must have some time to prepare for his presentation. Therefore a delay should be implemented that starts the input-automation after a fix amount of time. The program should always give responses to the internal state, like: How much time is left before the presentation starts and how long will the current slide last until a switch. Also it should be possible to pause the program while in presentation. If the presentation has ended, you should be able to start over. It should be possible to set parameters for: Delay-before-presentation, Time-for-each-slide, Amnout-of-slides-in-total.
The requirements could be more precise, but that should be enough.
The next thing is to think about how to implement it. Usually you draw nice diagrams like Class-diagrams and state charts.
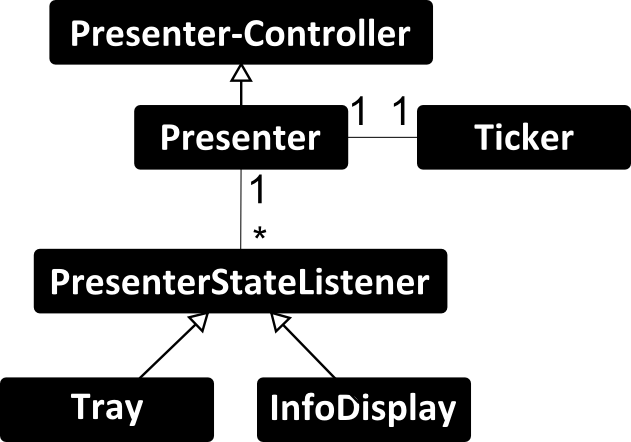
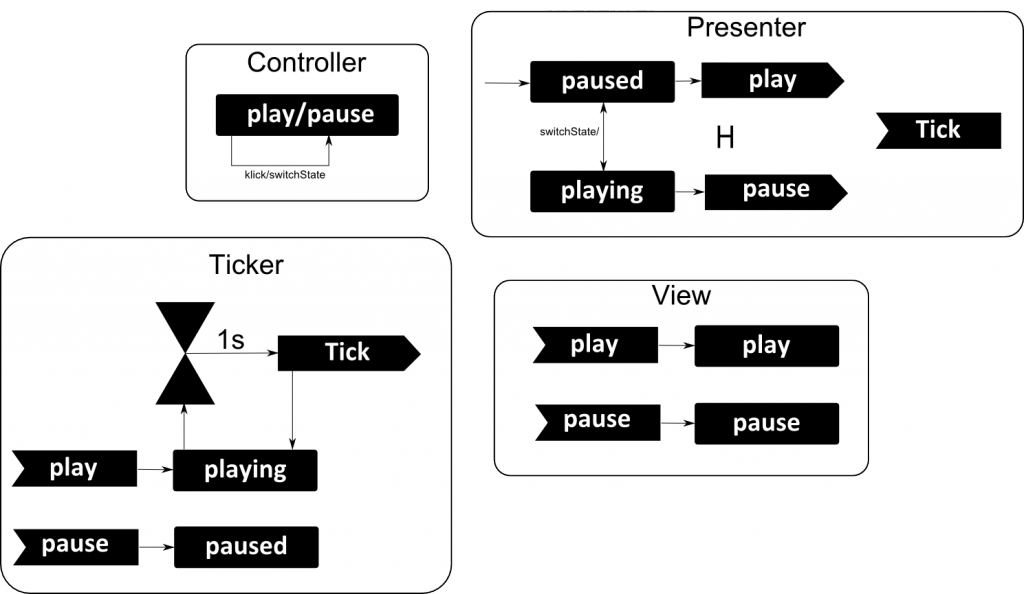
As we can see in the diagrams above, the Presenter is our Model (the M in MVC), Tray and InfoDisplay are Views but also Controllers. If we switch the state of our Model via the Controller, the Views (which implement the PresenterStateListener) are updated automatically. As timer I used a Ticker-Class which just calls a callback in the presenter ( tick() ) every second. The ticker can be in play or in paused state. PresenterController implements the Play/Pause state machine and the Listeners, Presenter implements the delay/next-slide state machine.
But enough about intention, requirements and design, let’s go see some code!
public class Main {

	public static void main(String[] args) {

	int delayFirst = 10;
	int slideCount = 15;
	int slideSeconds = 20;
	if (args.length == 3){
		delayFirst = Integer.parseInt(args[0]);
		slideCount = Integer.parseInt(args[1]);
		slideSeconds = Integer.parseInt(args[2]);
	}

	Presenter p = new Presenter(delayFirst,slideCount,slideSeconds); InfoDisplay d = new InfoDisplay(p);
	d.setVisible(true);
	Tray t = new Tray(p,d);

	p.addPresenterStateListener(t);
	p.addPresenterStateListener(d);
 }
}
This part should be obvious. We control alternative parameters via command-line args, then delegate everything to the Presenter. After that, we create the Views and connect the Listeners.
Let’s have a look into the Tray-Class, which I developed first, because it’s often easier to begin with a controlling element like a GUI. This allows you to implement the use-cases defined in the requirements-part and also allows you to find errors and misunderstandings between Customer and Contractor in a very early state of development. If all interactions are implemented, you can run usability-tests with real users. But personally I think beginning with controlling elements allows you develop an early logic which can be very good integrated into the final program.
Back to the Tray-Class:
/**
 *
 * Spawns a trayicon to control the presentation (play/pause)
 *
 */
public class Tray implements PresenterStateListener, ActionListener {
//this is a nice way to access ressources in the jar-file. But this also works in the normal filesystem.
	private final Image playImage = Toolkit.getDefaultToolkit().getImage(
			Tray.class.getResource("/resources/play.png"));
	private final Image pauseImage = Toolkit.getDefaultToolkit().getImage(
			Tray.class.getResource("/resources/pause.png"));
	private final String TOOLTIP_PLAYING = "pechakucha - playing";
	private final String TOOLTIP_STOPPED = "pechakucha - stopped";
	private TrayIcon trayIcon;

	private final PopupMenu menu = new PopupMenu();
	private final MenuItem exit_menu_item = new MenuItem("exit");
	private final MenuItem toggle_gui = new MenuItem("toggle gui");

	private final Presenter p;

	private final JFrame gui;

	private boolean disableTrayNotifications = true;

	public boolean isDisableTrayNotifications() {
		return disableTrayNotifications;
	}

	public void setDisableTrayNotifications(boolean disableTrayNotifications) {
		this.disableTrayNotifications = disableTrayNotifications;
	}

	public Tray(Presenter p, JFrame f) {
		gui = f;
		trayIcon = new TrayIcon(playImage, TOOLTIP_STOPPED);
		this.p = p;

		trayIcon.setImageAutoSize(true);

		trayIcon.setPopupMenu(menu);

		menu.add(exit_menu_item);

		exit_menu_item.addActionListener(new ActionListener() {

			@Override
			public void actionPerformed(ActionEvent e) {
				System.exit(0);

			}
		});

		toggle_gui.addActionListener(new ActionListener() {

			@Override
			public void actionPerformed(ActionEvent e) {
				if (gui.isVisible()) {
					gui.setVisible(false);
				} else {
					gui.setVisible(true);
				}

			}
		});
		menu.add(toggle_gui);

		if (SystemTray.isSupported()) {
			SystemTray tray = SystemTray.getSystemTray();
			try {
				tray.add(trayIcon);
			} catch (AWTException e) {
				e.printStackTrace();
			}
		}

		trayIcon.addActionListener(this);
	}

	public void setMessage(String msg) {
		if (disableTrayNotifications)
			return;
		trayIcon.displayMessage("pechacucha", msg.replaceAll("<br>", "\n"),
				MessageType.INFO);
	}

	@Override
	public void presenterPlay() {
		trayIcon.setImage(pauseImage);
		trayIcon.setToolTip(TOOLTIP_PLAYING);

	}

	@Override
	public void presenterPause() {
		trayIcon.setImage(playImage);
		trayIcon.setToolTip(TOOLTIP_STOPPED);

	}

	@Override
	public void actionPerformed(ActionEvent e) {
		this.p.switchState();
	}

	@Override
	public void presenterInfoUpdate(String msg) {
		setMessage(msg);

	}

}
The Trayicon should be very straight forward, there should be no problems to understand the code here.
The InfoDisplay class is also a very straight forward Swing JFrame:
/**
 *
 * Displays a play/pause button for the presentation,
 * a timer that shows when the presentation starts, when the next slide will be shown
 * and how many slides are left.
 *
 */
public class InfoDisplay extends JFrame implements PresenterStateListener,
		ActionListener {

	private static final long serialVersionUID = 1L;
	private JLabel body;
	private final JButton playpause;
	private final Presenter p;

	public InfoDisplay(Presenter p) {
		setSize(800, 300);
		playpause = new JButton("play");
		getContentPane().add(playpause, BorderLayout.SOUTH);
		setDefaultCloseOperation(EXIT_ON_CLOSE);
		playpause.addActionListener(this);

		this.p = p;
		body = new JLabel();
		body.setHorizontalAlignment(SwingConstants.CENTER);
		setMessage("press play to start");
		getContentPane().add(body, BorderLayout.CENTER);
		setTitle("pechacucha");
		setLocationRelativeTo(null);
		setAlwaysOnTop(true);
	}

	public void setMessage(String msg) {
//interesting things could be the String.format() method, which works like c's printf. Also nice is the usage of html and css to style the Label.
		this.body
				.setText(String
						.format("<span style="font-size: 40pt; font-weight: bold; text-align: center;">%s</span>",
								msg));
	}

	@Override
	public void presenterInfoUpdate(String msg) {
		setMessage(msg);

	}

	@Override
	public void presenterPlay() {
		this.playpause.setText("pause");
	}

	@Override
	public void presenterPause() {
		this.playpause.setText("play");

	}

	@Override
	public void actionPerformed(ActionEvent e) {
		if (e.getSource() == playpause) {
			this.p.switchState();
		}

	}

}
Now we have seen the View and Controllers combined as Trayicon/JFrame and PresenterStateListener
Lets look at some logic:
To make things easier, we will only look at the interesting parts of the logic and omit some boring getters, setters, variable declarations,…
As mentioned earlier the PresenterController implements the play/pause state machine:
protected enum State {
	PLAYING, STOPPED;
}

protected State state;

protected abstract void stateChangedStopped();

protected abstract void stateChangedStarted();

 /**
 * switches the state to play/pause; depends on the previous state
 */
 public void switchState() {
		if (state == State.PLAYING) {
			state = State.STOPPED;

			for (PresenterStateListener l : listeners) {
				l.presenterPause();
			}
			stateChangedStopped();
		} else {
			state = State.PLAYING;

			for (PresenterStateListener l : listeners) {

				l.presenterPlay();
			}
			stateChangedStarted();

		}

	}
On top of that, I created the Presenter class which uses a Ticker to time events. Every second the ticker calls the tick-method of the presenter. The presenter then decides what to do: Delay the presentation, count down the slide-timer or use the robot to send a “next-slide”-keystroke to the operating system.
/**
 *
 * The main control class for presentation.
 * Uses the Ticker to periodically perform an action (tick())
 *
 * Implements the next-slide, presentation starts, ends state machine.
 *
 */
public class Presenter extends PresenterController {

	private final int delayFirstSeconds;
	private int delayFirstSecondsPassed;

	private final int numSlides;
	private int slideCount = 0;

	private boolean firstPlay = true;

	private final int secondsForSlide;
	private int secondsForSlidePassed;

	private Robot robot;

	private final Ticker ticker;

	public Presenter(int delayFirstSeconds, int numSlides, int secondsForSlide) {
		super();
		resetState();
		this.delayFirstSeconds = delayFirstSeconds;
		this.numSlides = numSlides;
		this.secondsForSlide = secondsForSlide;
		ticker = new Ticker(this);
		try {
			robot = new Robot();
		} catch (AWTException e) {
			e.printStackTrace();
		}

	}

	/**
	 * resets the state of the presenter
	 */
	private void resetState() {
		delayFirstSecondsPassed = 0;
		secondsForSlidePassed = 0;
		slideCount = 0;
		firstPlay = true;
	}

	/**
	 * performs a systemwide "next-slide" keystroke (pgdown)
	 */
	public void nextSlide() {
		robot.keyPress(KeyEvent.VK_PAGE_DOWN);
		robot.keyRelease(KeyEvent.VK_PAGE_DOWN);
	}

	@Override
	protected void stateChangedStopped() {
		ticker.pause();

	}

	@Override
	protected void stateChangedStarted() {
		ticker.play();
		if (firstPlay) {
			firstPlay = false;
		}

	}

	/**
	 * callback for the ticker
	 */
	public void tick() {

		delayFirstSecondsPassed++;

		if (delayFirstSecondsPassed >= delayFirstSeconds) {
			secondsForSlidePassed++;
			// delay over, start
			if (firstPlay) {
				firstPlay = false;

			}

			if (secondsForSlidePassed >= secondsForSlide) {
				// next slide
				slideCount++;
				secondsForSlidePassed = 0;

				if (numSlides - slideCount 					// presentation over
					switchState();
					msgPresenterStateListeners("presentation finished");
					resetState();
					return;
				}
				nextSlide();
			}
			msgPresenterStateListeners("Seconds until next slide: "
					+ (secondsForSlide - secondsForSlidePassed)
					+ "
Slides left: " + (numSlides - slideCount - 1));

		} else {
			// delay phase
			msgPresenterStateListeners("Seconds until start: "
					+ (delayFirstSeconds - delayFirstSecondsPassed));
		}

	}

}
Then there is the Ticker class. The idea of the ticker is, that he has three states: PLAY, PAUSE, STOP. However STOP is never active because it would prevent the ticker from starting over. Once the run-method has ended, a Thread will never be alive again..
/**
 *
 * Performs an action (callbacks the Presenter's tick method)
 * every second.
 *
 *  The ticker can be in three states: PLAY, PAUSE, STOP
 *  On Play, every seconds the callback will be called,
 *  on Pause, the ticker-thread will be on wait.
 *  On Stop, the Ticker can never be in play or paused state again.
 *
 */
public class Ticker implements Runnable {
//The volatile keyword is not as easy explained as you might think,
//in short, use it to indicate that multiple threads will access it.
//Also note that the definition of volatile tightened up in java5.
	private volatile boolean stopped = false;

	private Thread ownThread;

	private long lastSecond = 0;

	private int every; //every.. second -> every=1

	private enum TickerState {
		PLAY, PAUSE, STOP;
	}

	private volatile TickerState state;

	private Presenter p;

	public Ticker(Presenter p) {
		this(p, 1);
	}

	public Ticker(Presenter p, int every) {
		this.p = p;
		this.every = every;
		state = TickerState.PAUSE;
		ownThread = new Thread(this);
		ownThread.setDaemon(true); //a daemon-thread will not cause the program to stay alive if no other thread is running.
		ownThread.start();

	}

	/**
	 * starts or continues the ticker (this method is idempotent)
	 */
	public void play() {

		state = TickerState.PLAY;
//notifyAll can only be called if it has the monitor
		synchronized (ownThread) {

			ownThread.notifyAll();
		}

	}

	/**
	 * pauses the ticker (this method is idempotent)
	 */
	public void pause() {

		state = TickerState.PAUSE;
	}

	/**
	 * stops the ticker (this method is idempotent)
	 */
	public synchronized void stop() {
		stopped = true;
	}

	@Override
	public void run() {
//again, we need to synchronize this on ownThread because ownThread.wait(); demands this.
		synchronized (ownThread) {

			while (!stopped) {

				while (state == TickerState.PAUSE) {

					try {
						ownThread.wait();

					} catch (InterruptedException e1) {
						e1.printStackTrace();
					}
				}

				if (System.currentTimeMillis() - lastSecond > 1000 * every) {
					// tick - a second
					p.tick();
					lastSecond = System.currentTimeMillis();
				}
			}
		}

	}
}
The idea is to loop infinitely if the ticker is in PLAY, and to pause the whole thread if it is on PAUSE. On STOP, we end the infinity-loop in the run-method.
You also see that I use timestamps to trigger events not Thread.sleep(TIME) to do that. The reason is that Thread.sleep is only as accurate as the precision and accuracy of systemtimers and schedulers. By checking everytime if the delta-value of the system-time is greater or equal than one second, we should be very precise.
So what happens if we pause the timer?
The Thread checks in a loop every time if we are in paused state. If that is true, he puts himself to sleep.
				while (state == TickerState.PAUSE) {

					try {
						ownThread.wait();

					} catch (InterruptedException e1) {
						e1.printStackTrace();
					}
				}
The call ownThread.notifyAll(); in play() wakes him up.
	public void play() {
		state = TickerState.PLAY;
//notifyAll can only be called if it has the monitor
		synchronized (ownThread) {
			ownThread.notifyAll();
		}
	}
You can download the project from github:
https://github.com/philipphock/PechaKucha.git


Letzte Kommentare